

In this first tutorial I will explain how to install Debian, an open source GNU/Linux distribution. Debian is by far my favorite GNU/Linux distribution to use and in my opinion, is the easiest to install, configure and use.
This tutorial was written with beginners and Windows users in mind, but basic knowledge of computer systems and operating systems is expected. I will provide links and explanations for all of the procedures and concepts covered. However, I take no responsibility for any shit you may fuck up/any damage you may or may not do to your or others computer systems – be sure you fully understand what you are doing before attempting it, and if not, research the topic more until you are confident to undertake it. If you have questions, post a comment and I will gladly point you in the right direction. I recommend you read the entire tutorial before starting. This tutorial will take approximately three hours to complete providing your internet connection speed is of an average speed.
To start off with, lets take a very brief look at the history of the development of the GNU/Linux operating system, what it is and what it does.
In 1991, while attending the University of Helsinki, Linus Torvalds became curious about operating systems and frustrated by the licensing of MINIX, which at the time limited it to educational use only. He began to work on his own operating system kernel, which eventually became the Linux kernel.
Torvalds began the development of the Linux kernel on MINIX and applications written for MINIX were also used on Linux. Later, Linux matured and further Linux kernel development took place on Linux systems. GNU applications also replaced all MINIX components, because it was advantageous to use the freely available code from the GNU Project with the fledgling operating system; code licensed under the GNU GPL can be reused in other computer programs as long as they also are released under the same or a compatible license. Torvalds initiated a switch from his original license, which prohibited commercial redistribution, to the GNU GPL. Developers worked to integrate GNU components with the Linux kernel, making a fully functional and free operating system.
-Wikipedia, Linux
Linux is modeled on the Unix operating system. From the start, Linux was designed to be a multi-tasking, multi-user system. These facts are enough to make Linux different from other well-known operating systems. However, Linux is even more different than you might imagine. In contrast to other operating systems, nobody owns Linux. Much of its development is done by unpaid volunteers.
…
Linux users have immense freedom of choice in their software. For example, Linux users can choose from a dozen different command line shells and several graphical desktops. This selection is often bewildering to users of other operating systems, who are not used to thinking of the command line or desktop as something that they can change.
Linux is also less likely to crash, better able to run more than one program at the same time, and more secure than many operating systems. With these advantages, Linux is the fastest growing operating system in the server market. More recently, Linux has begun to be popular among home and business users as well.
-Debian.org, What is GNU/Linux
So let’s jump right into it. If this is your first GNU/Linux install, I recommend using a virtual machine like either Virtual Box or VMware Workstation Player. Both are free, easy to use and are almost identical in their configuration and operation. The steps are fundamentally the same as if you were installing it directly to your hard disk drive. You can and you will fuck this up the first time around – severely – a virtual machine won’t render your computer unusable if you do, and will give you a chance to experiment with many different Linux distributions without destroying your host operating system. It will also give you a better grounding in knowledge of configuring your machine and installing operating systems.
Step One: Acquire Debian ISO
Go here and download an ISO image which is appropriate to your system. You can either download the image directly from the website or us a peer-to-peer application (like Transmission or Tixati). Be sure you acquire the correct architecture for the computer you are installing Debian on. You can check the supported architectures here (chapter 2: System Requirements, 2.1.1 Supported Architectures).
You can either download the netinst version, which is a smaller ISO image which only contains the base operating system – during the installation (‘Software selection’ screen) it will allow you to select which components you wish to download and install, but requires an active and working internet connection – or the Debian CD/DVD ISO image, which is a larger file. It contains the base system plus all other required components. It ultimately doesn’t matter which you choose, the main difference is the Debian CD/DVD ISO image is a much bigger initial download and will also contain more software that the netinst version will have to download during install.
Step Two: Burn ISO image to CD/DVD
You can skip this step if you are using a virtual machine – during the configuration of your virtual environment you are able to select which media the virtual machine boots from. The image below demonstrates this in VMware Workstation Player.

We can either copy the ISO image onto a USB or burn the image to a disk using CD/DVD burning software (Windows 7 onward has a built-in ability to burn disc images). I will now explain how to do both methods in a Windows environment.
CD/DVD procedure
Right click on the ISO image and click on the ‘Burn disc image’ option. The following window should open:

Insert a CD/DVD into your optical drive, select the appropriate drive in the Disc burner drop down and press the burn button and the image will be burned onto the DVD. It usually takes a little while, depending on the size of the ISO image.
USB procedure
To copy the ISO image onto a USB device, you are going to need to acquire a piece of software called Universal USB Installer. Get it here. This application doesn’t require an install, so once it has downloaded plug your USB device in and run the program.
 In the drop down menu for ‘Step 1’, select Debian Live or Debian Netinst depending on what ISO image type you downloaded. Use ‘Step 2’ to browse to the directory the ISO image is. Use the drop down menu for ‘Step 3’ to locate the USB device and toggle the ‘We will format *:\Drive as Fat32’. Press the Create button and the ISO image will be copied onto the device.
Step Three: Boot Debian media
If you are using a virtual machine, check the appropriate documentation for setting up the virtual environment for installing Linux on a virtual machine (check here for VirtualBox and here for VMware Workstation Player). If you installing directly over your host operating system, insert the appropriate removable media and boot your machine into BIOS setup/the boot menu, its usually accessed by pressing F2/F8 after POST (or whatever key is indicated as during POST). You don’t need to access the boot menu if you are using a virtual machine, if set up correctly it will automatically boot the ISO image.
I am using VMware Workstation Player to capture these images, but your POST screen will essentially look the same as this.

Once you have accessed the boot menu, select the appropriate device to boot from. In the image below, I have selected the CD drive. If you are booting from the USB, select the Removable devices option and boot the appropriate device.

If no boot menu is available, you’re going to have to enter the BIOS setup menu and access the Boot sub menu. Basically, the hierarchy in this menu dictates which device is loaded by by the boot loader after POST. Move the appropriate drive to the top of the hierarchy and save and exit BIOS setup. The machine will now reboot. The image below demonstrates how the boot device hierarchy should look after configuration.

The Debian installer boot menu should now be visible. Use your arrow keys to navigate the options. Select Install and hit enter.

Step Four: Begin install – set up users and passwords
The first few screens in the installation will ask you to select your language, location and the keyboard keymap to use. Then it will begin to detect hardware and attempt to configure the machine with DHCP on your network. The next screen that requires your input will be to set your hostname, it defaults to ‘debian’. This essentially is the name of your machine on your network. You can set it to whatever you like.

The next screen will ask you to set your domain name. Leave this blank, unless you know what you are doing. The next screen will ask you to set the root password. Make sure you set a good password. This is basically the administrator of the system. Do not forget this password. It will ask you to verify the password.

As it is not recommended you run your system as a root user, the installer will ask you to set up a new user. It will ask you to set your full name, username (used to log into your account) and password.

After this the installer will as you to select the timezone you reside in. This is used to set the systems time and date and configure network settings.
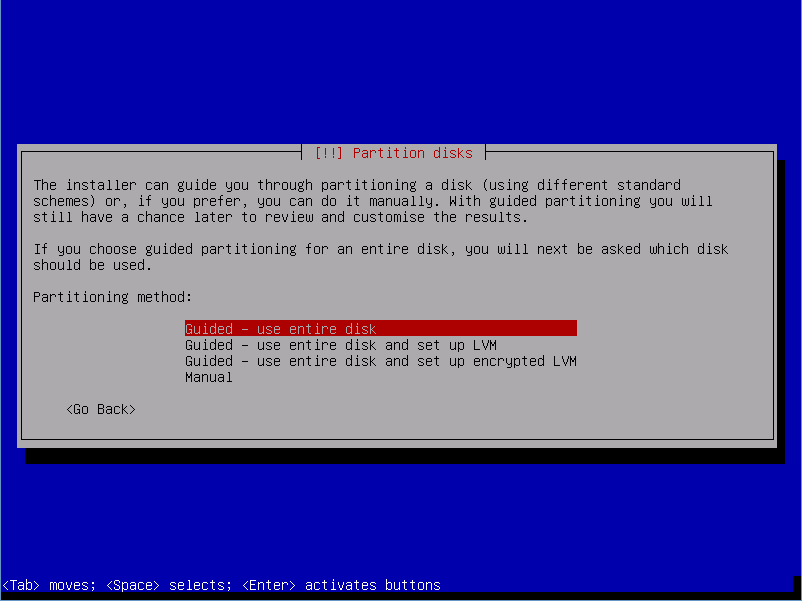
Step Five: Partition disks
This is where new users tend to fuck things up, as setting up a disk partition correctly is pretty complex task. I won’t go into full detail of the concept and process of partitioning as it is a complex topic to cover. For the purpose of keeping this tutorial simple, we will select the first option. The second option is for setting up a Logical Volume Mapper and the third option is for encrypting the partition that Debian is installed on to. This basically means before your machine boots this partition, you must enter a passphrase you have set – however I am not going to cover this.
The next screen will ask you to select which disk you would like to partition. If you are using a virtual machine, this will be the virtual drive you set up when you initially configured your virtual machine. If you are not using a virtual machine, it will list the hard disk drives in your machine.

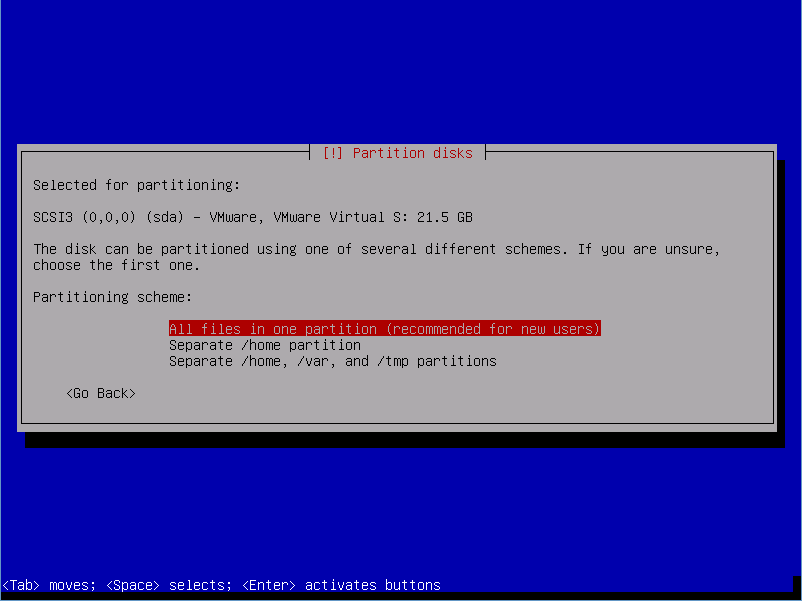
The following screen will ask you what partitioning scheme you would like to use. As suggested by the installer, we will select the first option.
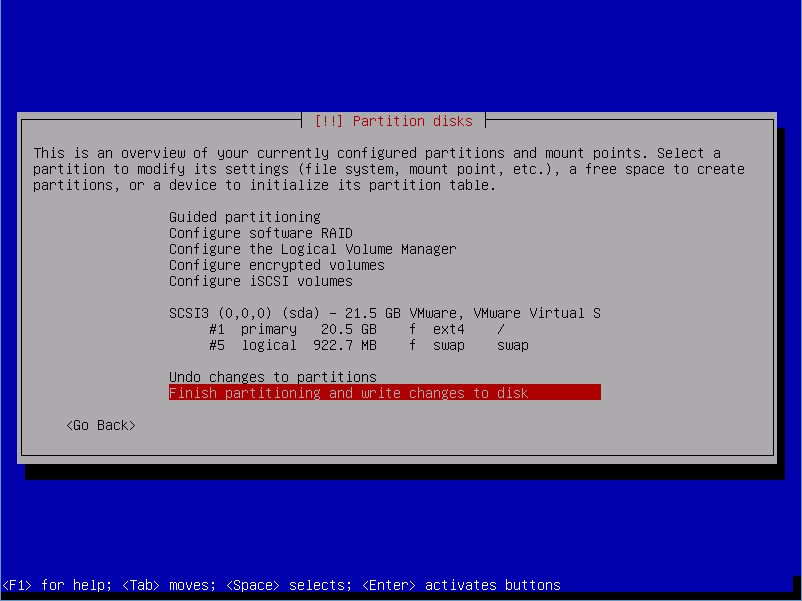
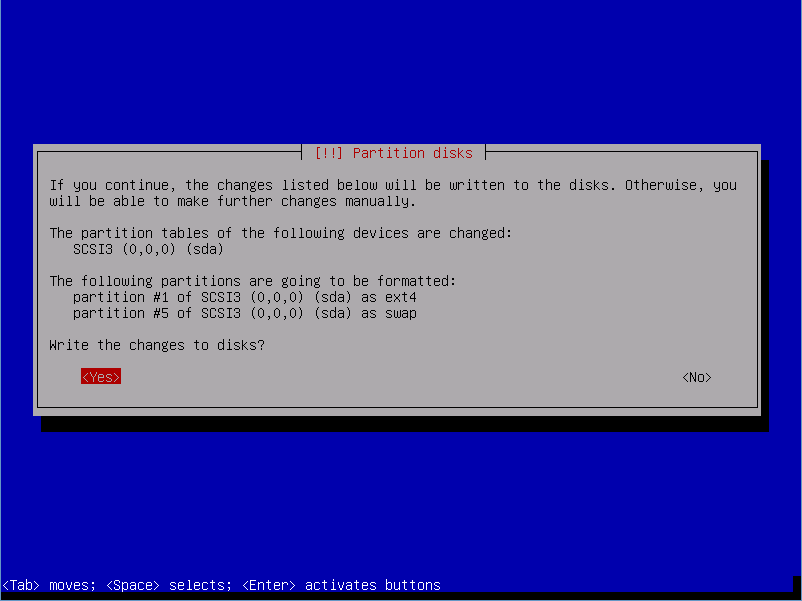
The following screens will show you an overview of the partitions configuration and ask you to confirm the changes. Take note of the device name, we will need to know this later on when configuring the boot loader. In the second image below it is listed as sda.
It will now begin installing the base system.

Step Six: Configure package manager
If you downloaded the Debian CD/DVD (Disc 1), the following message will appear. We will select no. The following screen will ask you if you would like to use a network mirror for the remainder of the install. We will select no.


The installer will then begin copying the necessary files from the CD/DVD/USB to begin the install. It will then ask you if you wish to participate in the package usage survey. We will select no and continue on with the install.

Step Seven: Software selection
As the Debian install media only includes a very basic set of software and we didn’t use a mirror archive, the only software available to install is the Debian desktop environment and the standard system utilities. Navigate to Continue and hit enter.

It will then begin installing the software onto the system.

Step Eight: Install GRUB to the master boot record
This is one of the final steps in the installation process. GRUB at boot basically provides you with an option on which operating system you would like to boot. This is used if you have multiple operating systems installed (see multi-booting). We will select yes and GRUB will be installed and configured.

The following screen will ask you which device you want to install the master boot record onto. We will select the device with the Debian partition, /dev/sda/ (this may be different on your machine, refer to the note you took when you were partitioning the drive). Then it will configure the boot loader and the installation will be complete.


Step Nine: Boot Debian and modify sources.list
Debian has been successfully installed and is ready for you to boot up and log in. The machine will now reboot and GRUB will start. Select Debian and hit enter.

As we didn’t use a archive mirror, we didn’t install a GUI desktop environment so from here on out we will be using the command line. We want to login as the root user, so type root and hit enter. The shell will then prompt you for a password. Type the root password you set during the install. Note: it will not print the password to the screen or any indication of any characters entered – it is actually taking input, this is just an added security feature of UNIX systems. Hit enter and it will log you in.


You are now logged into the root account of your new Debian installation. The next part of this step requires you to manually type and enter commands into the command line. This may seem intimidating at first, but it is essential to your journey into GNU/Linux.
Firstly, to begin with we are going to modify our sources list used by the package manager to update the software and their required repositories on our system. For more detailed information on the sources list and how it functions, go here. To access this file for modification we are going to use a command line text editor called Nano. To begin this task we will type the following command into the terminal: nano /etc/apt/sources.list
This is the most basic and fundamental structure of commands entered into the terminal. Nano is the application we are using, the preceding information is where the directory the file we are editing is located with the final entry being the actual file we are editing (sources.list). Hit enter to execute the command. This will open the sources file with Nano.

To navigate around the nano text editor, use your arrow keys. Control + O saves and Control + X exits the program – these will be the only commands we will be using in this session. Firstly, using the backspace key delete the lines underlined with red in the image above. Lines beginning with the hash key are considered comments and are not interpreted by the package manager. Remove the hash character from the beginning of the lines underlined with green. Remove the comments about the network mirror. Now for all lines starting with deb and deb-src we will add the words ‘contrib’ and ‘non-free’.
At the beginning of the file we will add the following lines:
deb http://ftp.debian.org/debian/ jessie main contrib non-free
deb-src http://ftp.debian.org/debian/ jessie main contrib non-free
The file should now look similar to the image below. Press Control + O to save, hit enter to confirm the changes and then press Control + X to exit.

A lot of configurations in GNU/Linux are handled this way. I’ll cover in more detail what we actually did here in future tutorials.
Step Ten: Update repositories and upgrade system
The next step is to update the package lists and fetch the new versions of the packages and other dependencies required by the software. Enter apt-get update into the command line and hit enter. The ‘apt-get update’ command downloads the package lists from the repositories and “updates” them to get information on the newest versions of packages and their dependencies. The output should look similar to the figure below.

Now enter apt-get upgrade into the command line. The ‘apt-get upgrade’ is used to install the newest versions of all packages currently installed on the system. The output will look similar to the figure below. Enter ‘y’ into the command line and press enter to begin the upgrade.

You will use these commands a lot throughout your time with GNU/Linux, they essentially ensure all the software on your system is up to date.
Step Eleven: Install a GUI desktop environment and sudo
For the GUI desktop environment we will now install three pieces of software, the X Windows System, GNOME and GDM. This will give you a desktop environment not dissimilar to a Windows or a Apple system, as well as a suite of common desktop applications. We will use the Advanced Package Tool (‘apt’) command to download and install them. Enter apt-get install xorg gdm3 gnome into the command line. You could download and install these packages individually (i.e ‘apt-get install xorg’, ‘sudo apt-get gdm3’ etc.), but for simplicity sake we’ll just do them all together. At the prompt, enter ‘y’ and the command line will generate output like what is pictured below. The download is roughly 2.5GB so depending on your internet connection, it might take a little while.

Finally we will install sudo. Enter the command apt-get install sudo. Once sudo has installed, enter the command adduser yourusernamehere sudo. This will add your username to the group sudo, and will allow this user to enter commands only available to the root user.

Enter the command logout and log in using your username. Once logged in, enter the command startx to initialize the X Windows System. This will also start the GNOME desktop environment. Welcome to your new Debian environment.

It pays not to get use to all the shiny buttons and menus that lie before you (even if they do look really nice and inviting), the real power of the GNU/Linux system lies in the operation of the command line. Hit Alt+F2 and in the ‘Enter Command’ window, enter ‘gnome-terminal’. This will start a terminal. Type sudo shutdown -h now and hit enter to shut the system down. It will ask you to enter your password (as will all commands following the sudo command), then the system will shut down.
Conclusion:
If you have successfully installed Debian + the GNOME desktop environment, congratulations! Your journey into the world of GNU/Linux has begun. Welcome to the dark side.
In this tutorial we have covered: how to set up operating system media for installation, installing a GNU/Linux operating system, basic command line operation, a brief overview of configuring the Advanced Package Tool sources list and installing, updating & upgrading software on a GNU/Linux system using the Advanced Package Tool. I hope this tutorial has been as informative as it has been as fun writing.
